Trending Topics

 Trending
Why can’t I download photos from my Android phone to my PC?

Table Of Contents−
A USB cable is one of the most common ways to download photos from your Android phone to your PC. It should be as simple as plugging everything in and importing your pictures with an app like Windows Photos. However, it may not always work, and you may encounter an error that looks something like this:

So how do you get your photos onto your PC if this happens? Let’s find out.
Related reading: What is App Cloud? How do I delete it?
Is my computer at fault?
You can’t put the blame on Windows this time. When connected to a computer via USB, practically all Android phones block your PC from importing any data by default. Fortunately, once the two devices are linked, the option to change these settings becomes available; it simply takes a bit of searching to find it.
Okay, where do I start?
The first step is to scan through your phone’s notifications section.
(If you’re not sure how to view your notifications, simply unlock your phone and then swipe down from the top of the screen with your finger. The phone’s quick settings, as well as any notifications, should now be visible.)
If you look at the picture below, you will see a USB notification that is just about visible second from the bottom.
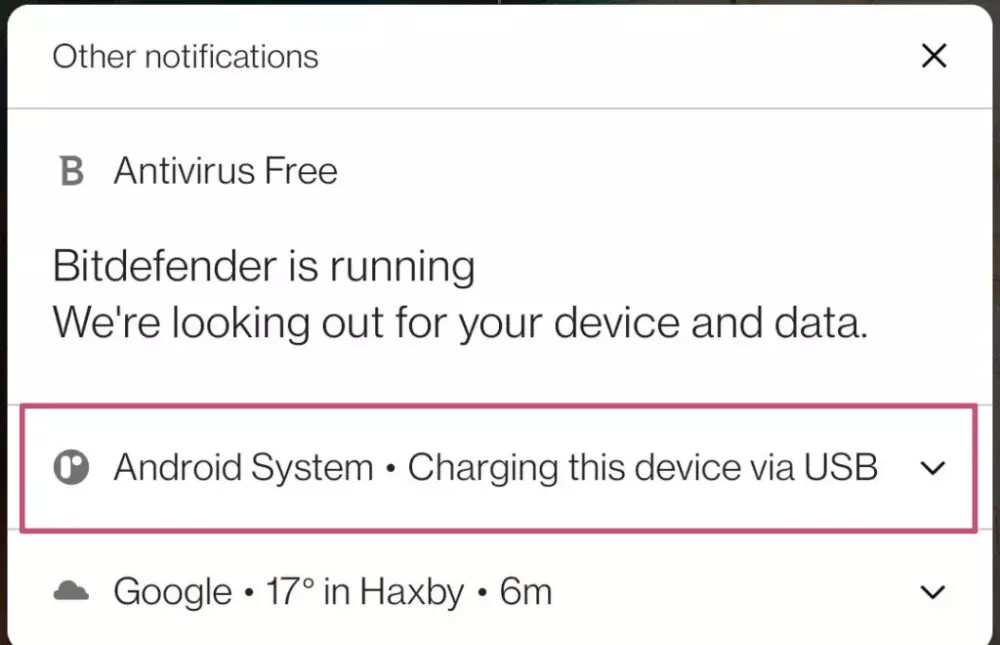
You now need to tap on the notification and it will enlarge slightly.
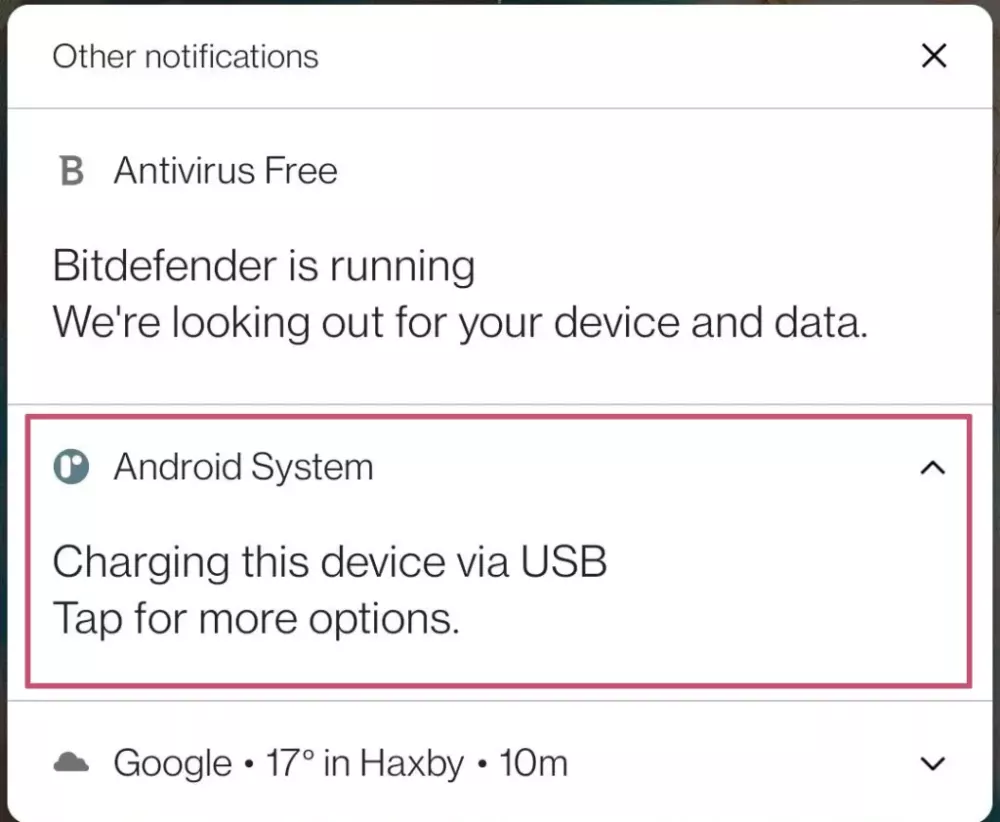
The next step is to tap the notification again, and the USB preferences window will open. The settings shown may differ on some Android phones but, in this example, the default setting is No Data Transfer.
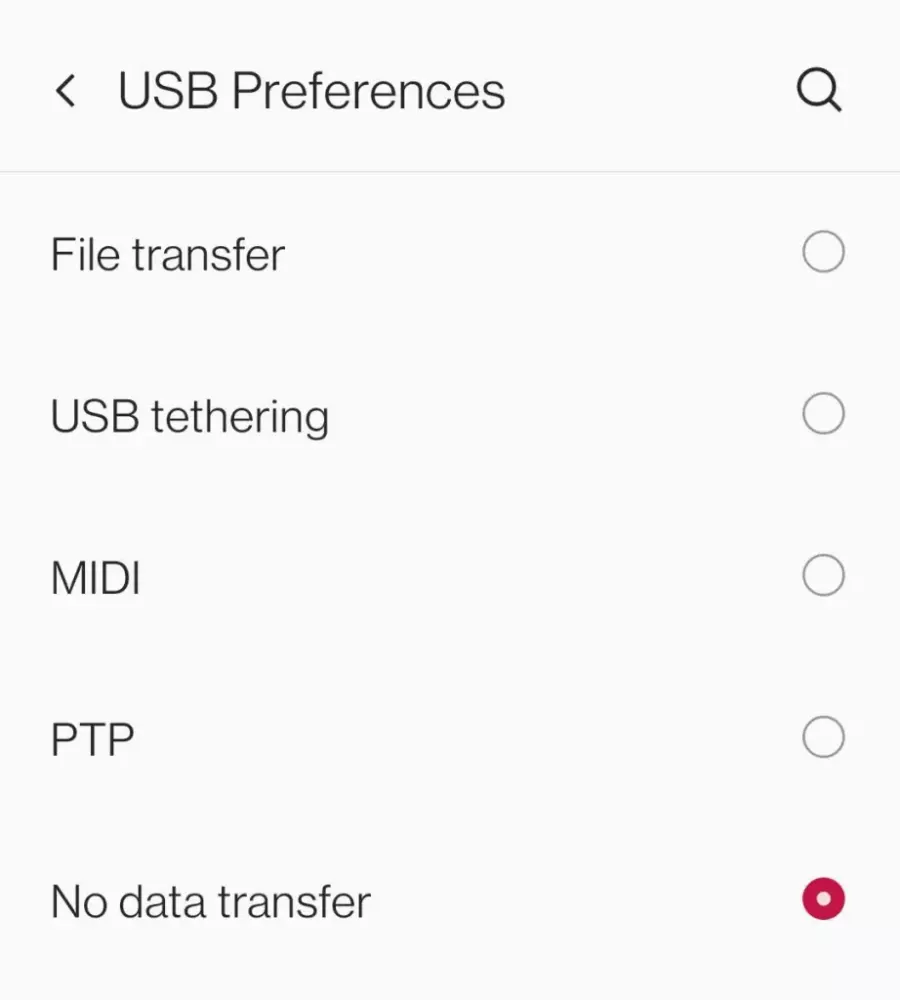
With this option enabled, the computer cannot locate and import your images. You therefore now need to select the option that allows the transfer of your photos. Typically, this is File Transfer.

Again, this setting may differ between phones. For example, on many Samsung phones, you have the option of transferring files or transferring images. If this is the case, make sure to select Transferring Images when importing your photos.
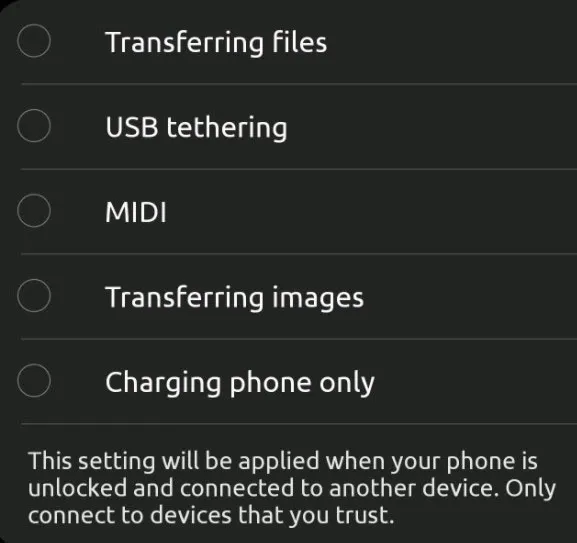
After choosing the transfer option, Windows Photos – or your preferred app – should now recognise your phone and pictures and allow you to import them.

Other ways to transfer photos from Android to your PC
If you still can’t get your phone and PC to talk via USB, or if you’d prefer a wireless alternative, there are several other reliable methods you can try:
1. Use Google Photos to back up and download images
Most Android phones come with Google Photos pre-installed. Once your photos are backed up to the cloud, you can access them from any web browser:
- Open the Google Photos app on your phone.
- Tap your profile picture and choose Photos settings > Backup & sync to ensure it’s turned on.
- On your PC, visit photos.google.com and sign in with the same Google account.
- Select the photos you want and download them directly to your computer.
This is especially useful if your USB cable is faulty or if you’re on the move.
2. Transfer via Bluetooth
If your computer has Bluetooth and you’re transferring a small number of images:
- Enable Bluetooth on both devices.
- Pair your phone and PC via Bluetooth settings.
- Select the images you want to send on your phone, choose Share > Bluetooth, and select your PC from the list.
- Accept the transfer on your PC.
Note that Bluetooth is slower than other options and better for a handful of images rather than large albums.
3. Use Microsoft’s Phone Link app
Windows 10 and 11 include Phone Link, which lets you wirelessly access your phone’s messages, notifications — and even photos:
- On your PC, search for Phone Link in the Start menu.
- On your Android phone, install Link to Windows (available on most Samsung and Honor devices) or download it from the Play Store.
- Follow the on-screen pairing instructions.
- Once connected, open the Photos tab in Phone Link to view and drag photos straight onto your desktop.
It’s a convenient, no-cable-required solution if you use your PC and phone together often.
4. Use a microSD card
If your Android phone supports microSD cards:
- Move your photos to the SD card using your phone’s file manager.
- Eject the card and insert it into your PC’s card reader.
- Copy the images directly from the card to your PC.
This is ideal for larger photo batches or when you don’t have Wi-Fi access.
Common USB issues and how to fix them
Even when you’ve selected the correct USB transfer option, other technical hiccups can still stop your photos from appearing on your PC. Here are some troubleshooting tips:
1. Use a high-quality data cable
Not all USB cables support data transfer — many cheaper ones only handle charging. If your phone isn’t detected, try using the original cable that came with your device, or a known data-capable one.
2. Try a different USB port
Some PC USB ports (especially front-panel ones on desktops) can be unreliable or limited in power. If the phone isn’t recognised, plug it into a different port — ideally one directly on the back of your computer.
3. Update device drivers
Windows sometimes needs updated drivers to properly detect Android devices:
- Open Device Manager on your PC.
- Expand Portable Devices or Universal Serial Bus controllers.
- Right-click your phone’s name (or unknown device if it appears) and select Update driver.
4. Switch between PTP and MTP modes
Some phones offer both MTP (Media Transfer Protocol) and PTP (Picture Transfer Protocol) under the USB preferences menu. If one doesn’t work, try switching to the other — particularly if your phone is older or you’re using legacy software.
5. Restart both devices
Classic advice for a reason. Disconnect your phone, restart both your PC and phone, and try connecting again.
How to organise imported photos efficiently in Windows
Once your photos are finally on your PC, it’s worth adopting a system to keep them organised — especially if you plan to back them up or edit them later. Here are a few simple practices:
- Create folders by year and event
For example:Pictures > 2024 > Holiday_BaliPictures > 2025 > Family_Birthday
This makes it much easier to find specific images later.
- Rename large batches of files
If your images are namedIMG_20240619_123456.jpg, you can quickly batch rename them in Windows:
- Select all the files you want to rename.
- Right-click and choose Rename.
- Enter a new base name (e.g.
Bali_Holiday_2024) and press Enter. - Windows will automatically number them sequentially.
- Tag photos for easier searching
Right-click an image, choose Properties, go to the Details tab and add tags in the Tags field. This makes it easier to search for specific images using keywords in File Explorer.
Conclusion
The process to download photos from your Android phone to your PC with a USB cable is usually simple. If it isn’t working for you, follow this guide to find and change the options needed for a smooth transfer.
Related reading: What is Thunderbolt 5?
This article was updated on the 20th June 2025 with additional tips and tricks.
About The Author